Elevate Your Layering Stencils For Your Backgrounds
KEY TAKEAWAYS
Space-Saving: Layering stencils are easy to store compared to bulky stamps or dies.
Foolproof Florals: Get perfect, professional results every time, even if you aren't a natural artist.
Added Dimension: Use foam tape and "puzzling" techniques to turn flat stenciled backgrounds into 3D masterpieces.
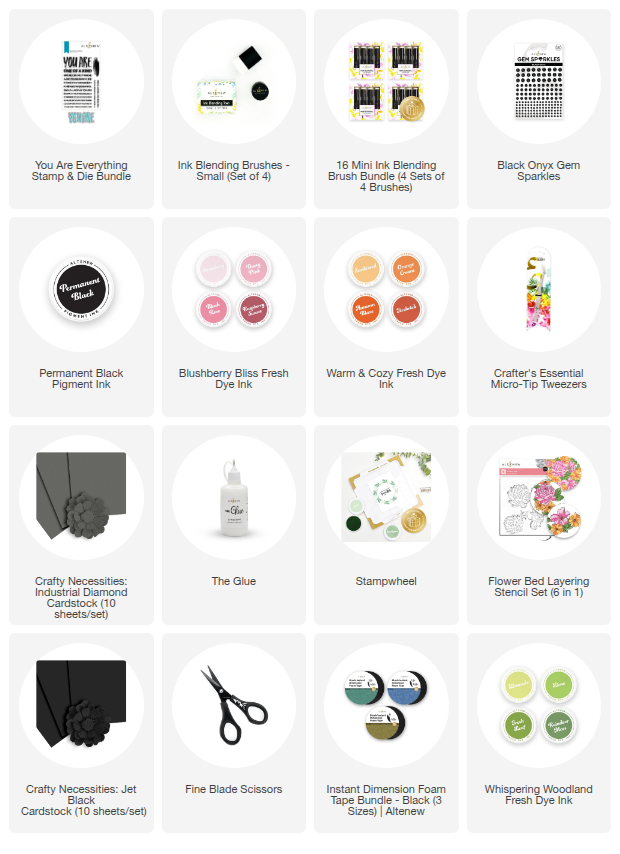
Custom Colors: Mix and match ink bundles like Blushberry Bliss and Whispering Woodland for seasonal variety.
Hi Altenew friends and fans! I hope you are in a "spring bloom" mood, because today I am going to create a gorgeous ink-blended card using the Flower Bed Layering Stencil Set.
This isn't a brand-new set, but it is so fun, and as a budding gardener, I am very drawn to it. I have high aspirations of becoming a proper, successful "Crazy Plant Lady." While I am working on my real-life gardening skills, I’m enjoying getting perfect results every time with layering stencils for card making. It’s such a great "cheat code" for amazing backgrounds! This specific set is fabulous, and another of my all-time favorites is the Stencil Art: Majestic Roses Layering Stencil Set.
Why Layering Stencils are a Must-Have!
Both of these stencil sets create a full A2 card background (4.25" x 5.5"). Mixing and matching colors is a fun way to create unique looks every time, and these two sets will definitely stay in my stash for years to come. Not just because "I love big blooms and I cannot lie," but because stencils take up very little space in a craft room. That is a definite win-win for any organized crafter!
Choosing the Best Inks for Layering Stencils
For this card I have gone for very similar colors as the inspiration look on the packaging. I don't think I used the exact colors suggested, but went with pinky-reds and orange inks, as well as a couple of rich greens. You will need two colors minimum for each grouping, but only one per stencil layer, you can of course be a bit fancy and creative here and mix and match your colors, but minimum you will need two shades of each color to bring out the details.
For the pinky-reds I have used some of the shades in the Blushberry Bliss Fresh Dye Ink bundle, for the orange shades I have gone for the Warm & Cozy Fresh Dye Ink bundle and the greens are from the Whispering Woodland Fresh Dye Ink bundle. The two darkest shades are the ones I ended up using, but this green ink family is fabulous for all year round. The lighter shades are fab for spring, with the touch of yellow in them. The darker shades are rich enough to be a good choice for winter holiday cards.
Creating Texture and Dimension with Layering Stencils
Since layering stencils make creating a background so quick, we can spend more time on the fun finishing touches! Even though these blooms look incredibly realistic, they are technically flat. I wanted to fix that by adding physical interest and texture to the panel.
Directly onto the stenciled background, I stamped "You are" and "stronger than you seem" in Permanent Black Ink using the Stampwheel. These are from the You Are Everything Stamp set—one of my all-time favorites.

Professional Die-Cutting Tips for Stenciled Panels
The You Are Everything Stamp Set has a coordinating die that cuts out the "You Are" portion. I used this to cut the words directly out of my stenciled panel. I also cut three additional pieces from Jet Black Cardstock and layered them up with liquid glue for a thick, chipboard-like feel.
I trimmed the finished panel slightly smaller than the standard 4.25" x 5.5" size to create a border. While I had the trimmer out, I also cut out the "stronger than you seem" part of the sentiment. This does mean you’ll be "chopping up" your beautiful, stenciled background, but don’t worry—we are going to puzzle it back together!
Let’s Add Those Layers!
I wanted a smidge of drama, so I used Industrial Diamond cardstock for the base. I adhered the stenciled pieces using the new Black Instant Dimension Foam Tape. It looks so much more professional because there is no white foam peeking out from the sides!

The "You Are" die-cut pieces were slotted back into their original places and adhered. It looks so cool with the different heights, and the Flower Bed Layering Stencil background is the perfect foundation for this design. Because this is a "soft-look" stencil (no harsh outlines), it’s very forgiving if your alignment isn't 100% perfect, making it a brilliant starter set for beginners.

Finishing Touches and "Bling"
Obviously, because it’s me (Hi, I’m Erica, and I’m addicted to bling), I decided a few Black Onyx Gem Sparkles were necessary. I started out restrained, but I realized I only had a few left on the sheet, so I figured I might as well use them all! It escalated quickly, but I think the final result worked out really well.

With that, I am all done for today! I hope you enjoyed this post and get a chance to watch the process video as well.

With love, light, creativity, and sparkle,
Erica

Anniversary Special:
Get a FREE Large Angled Blending Brush (worth $7.99) on orders over $59 from April 3, 2026 at 12:01 AM EDT until April 5, 2026 at 11:59 PM EDT. Shop here: https://oltonew.shop/collections/all-the-paper-crafting-supplies-you-need